Python behave, Dipping Our Toes In
What is Python behave?
Python behave is a Behaviour driven development (BDD) tool that is used to test the behavior of a particular solution; this can be anything from a website to cloud computing infrastructure. It’s a great tool to test your solutions from an “external” perspective; what I mean here is that it doesn’t care about the code used to develop a particular solution, unlike unit tests, but rather, focuses on the behavior of the solution itself, such as testing the behaviour of an API endpoint.
Throughout this blog, I want to show you how to, firstly, set up and structure your behave tests, secondly, create a set of tests based on a simple use-case, and finally, run them and review the results.
Example Use Case
To keep things simple, I’ve used a very basic use-case, that being “check to see if a given endpoint returns an HTTP response code of 200”, which hopefully, shows you how simple this can be to set up, but also how this can be expanded to perform more complex testing.
Setup
You first need to install behave. you can do this using pip by running the command below:
pip install behave
I suggest that you create a Pipenv and install this via your Pipfile, as can be seen below:
If you’re unfamiliar with Pipenv, have a look at the docs.
Basic Structure
The basic structure for a behave directory comprises the root behave path, the features path, which contains your environment.py and your feature files, and finally a steps path, which contains the steps python scripts, which actually perform the defined tests. These will all be discussed in more detail in the following sections.
Below is an example of this:
└── behave
    └── features
        ├── __init__.py
        ├── environment.py
        ├── example.feature
        └── steps
            ├── __init__.py
            └── common_steps.py
Environment File
The environment.py file can be thought of as a wrapper around your feature(s). behave has a
variety of hooks which can be executed
before and after features, which are defined in the environment.py file. You can use these to set up, for example,
conditions based on user defined input. For the purpose of this use-case, we’re utilising the before_all() hook,
which will be run prior to any features. Within this hook we’ve defined the conditional variable domain (in this case,
they’re all the same, but you get the point) based on the user input variable env. The variable env is passed in as
user input (within the context of behave, this is called userdata), which we’ll discuss towards the end of this blog.
Feature file
The feature file is where we define our test case(s) in natural language, specifically by using the Gherkin Language.
This essentially follows a format which is defined by specific keywords, such as Feature, Background, Scenario,
Given, When, Then. There are more, though for the purpose of this blog, we’ll stick to these.
This should look something like the following:
Feature
The Feature encapsulates all tests executed against a particular solutions feature. A Feature can contain one or
many Scenarios.
Background
The Background is used to provide context to the Fetaure, and makes available context to each Scenario defined
within the Feature. This is executed prior to each Scenario, though for the purpose of this blog, I’ve simply
included this for structural purposes, and am not actually passing useful context to the Scenario from it.
Scenario
The Scenario is where the nitty-gritty happens. This is where we define what actions we want to make for this
particular test. This should be limited in scope; you can think of this like a unit test. As you’ll have noticed in the
example above, it’s within this section that we make use of the Given, When, Then keywords. These directly
correspond to functions defined in the steps.py file (discussed below) with the use of decorators, specifically
@given, @when, and @then.
Step File
As mentioned above, the steps.py file(s) is where we define our functions that actually perform the tasks defined in the
Scenarios. These are tied together by the use of decorators, as can be seen in the example below. I’d like to also
mention that these functions can be used across multiple Scenarios, so make sure to not hardcode anything that’s
Scenario specific into them. Instead, pass in variables via the Scenario itself. You can see an example of this in
the @then('we get the response code "{status_code}"') decorator and function, where the status_code is passed in via
the Scenario (refer back to the Feature file sample code).
Running your tests
behave cli
The behave package comes with a cli tool, which is what’s used to execute the tests. There are a bunch of features that
the CLI tool provides, though I won’t cover them here, except for the -D command, which allows us to provide
additional userdata in the format of key,value pairs. This is how I passed in the env value in the environment.py file.
For more information on the behave cli, have a look at the docs.
Execution
Executing these tests is very simple. You just need to provide the feature path and any additional flags; in this case
the -D command to input the environment.
behave path/to/features -D env=dev
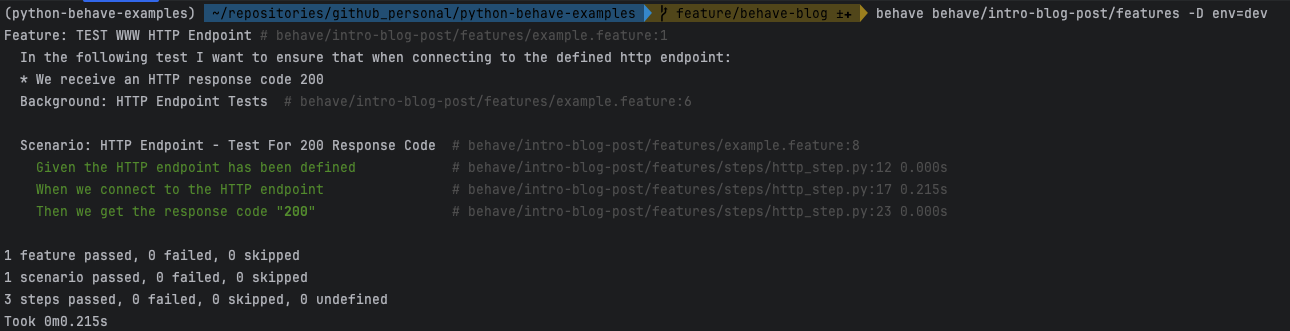
Output
In the following image, you can see that the feature, scenario and associated steps were executed and passed.
Summary
Hopefully, you’ve gained some insight from this post; it had taken me a while to wrap my head around how all the pieces
tied together, so I wanted to write this down in as simple a format as I could. I aim to follow this up with some more
complex examples. In the meantime, happy coding ![]()